Documentation Index
Fetch the complete documentation index at: https://docs.kadoa.com/llms.txt
Use this file to discover all available pages before exploring further.
Introduction
Data validation lets you define rules that detect anomalies or unexpected results after a workflow run. Use it to detect missing values, outliers, and schema issues before downstream use.Prerequisites
- A completed workflow run with preview data (Kadoa will automatically suggest initial validation rules)
Configure validation
- Open the workflow in your dashboard.
-
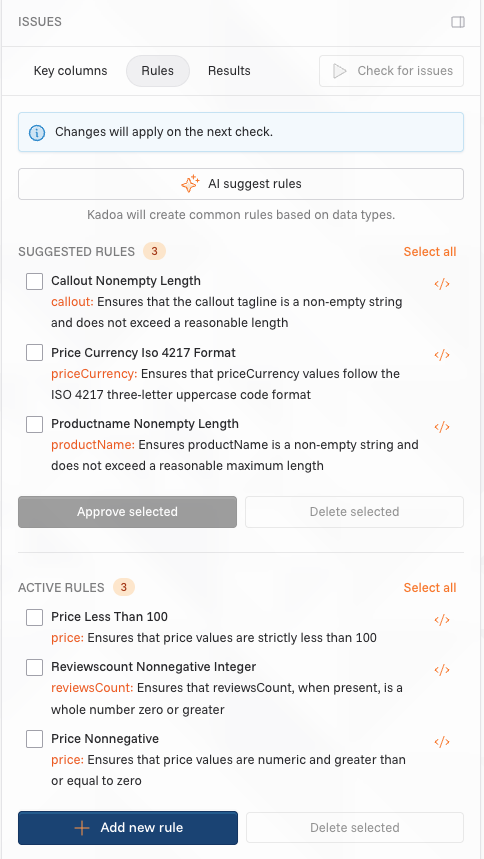
In the sidebar, select
Issues. You will see 2 tabs there:Rules: Create, view, suggest, and delete validation rules.Results: Review issues found by rules for the selected run.
-
Select the
Rulestab.
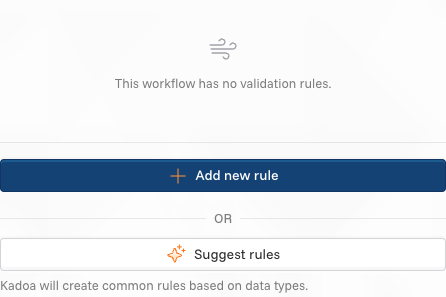
- Choose one of the following:
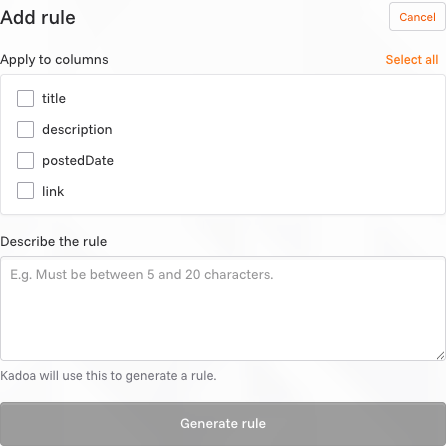
- Add new Rule: Manually choose a target column, define a condition, and (optionally) add domain hints for better precision.
- Suggest Rules: Kadoa auto-suggests rules from your schema and sample data.
Suggested rules
Kadoa suggests validation rules in two ways:- Automatically: After preview run, Kadoa analyzes your data and suggests relevant rules
- On demand: Click “AI suggest rules” to generate additional suggestions

On-demand rule generation doesn’t yet consider existing rules and may suggest overlapping validations. Review suggestions carefully before approval.
Approving rules
Suggested rules start inPREVIEW status and must be approved before they detect validation issues. To approve rules:
- Navigate to the
Rulestab in the Issues sidebar. - Review the suggested rules in the “Preview” section - each shows the rule name, target columns, and SQL condition.
- Select rules to approve using the checkboxes next to each rule.
- Click the Approve button to activate the selected rules.
- Approved rules move to the “Enabled” section and will run on the next workflow execution.
PREVIEW to ENABLED status and begin detecting validation issues on subsequent runs.
Deleting rules
To remove rules you no longer need:- Navigate to the
Rulestab in the Issues sidebar. - Select rules to delete using the checkboxes next to each rule.
- Click the Delete button to remove the selected rules.
- Confirm the deletion when prompted.
Disabling rules
To temporarily stop a rule from running without deleting it:- Click the menu icon on the rule you want to disable.
- Select “Disable” from the menu.
- The rule moves to the “Disabled” section.
Rule execution
- Validation is executed at the end of each subsequent pipeline run
- Preview rules require approval before detecting validation issues
- Changes take effect on the next run
- Invalid rules auto-disable when schema changes break them
Working with rules
For detailed information about rule states, SQL structure, and examples, see Data Validation Concepts.Rule operations
- Create manually: Select target columns and describe the rule in natural language
- Generate suggestions: Auto-generate common rules based on data types and sample data
- View SQL: All rules expose raw SQL for transparency
- Bulk actions: Select multiple rules and approve or delete them at once
- Auto-disable: Rules are automatically disabled by Kadoa when schema changes break them
- Historical runs: When viewing a past run, you’ll see the rules that were in effect at that time (read-only).
Validation report
After a run finishes, go toIssues → Report.
- See issues grouped by rule.
- Click an issue to open the row detail and view all issues associated with that row.

Results view details
- Filter by rule: Use the filter to focus on specific rules when multiple are present.
- Row details: Click an item to open the row and see the offending value and related context.

- Rule states:
PREVIEW: suggested rule awaiting review and approvalENABLED: active rule generating validation issuesDISABLED: inactive rule
- Issue status indicators:
NEW: first time the issue appearsRESOLVED: issue no longer present
- Summary chips show change since previous run:
+nnew issues,–nresolved
Key fields (optional)
Defining key fields lets Kadoa track rows across runs for richer insights.- Configure in
Schema. - Pick one or more fields used to match the same row across runs.
- Requirements: values should be present for most rows and unique per row (no duplicates).
How to pick key fields
- Prefer stable identifiers (e.g., product ID, URL, SKU).
- If a row cannot be matched via the key, it is treated as a new row.
Key‑based insights
When key fields are set, the report shows change indicators between runs:+n: new issues discovered since the previous run-n: issues resolved since the previous run
Validate now
Use theValidate now button to schedule validation for the current workflow’s latest data. This is available when no specific past run is selected.